12th Century Turn Shoes: A Brief History and Construction
Part 2
Pattern:
This pattern consists of three major pieces for expediency – the sole, the vamp and the back quarter which sewn together comprise the major parts of the shoe. To start this project you will need the following materials:
| 5-6 oz leather (chrome-tanned is easiest) 8 oz cattle leather for sole 2 sq ft canvas or non-stretchy fabric Manila folders Blunt tipped needles (tapestry will work) Sharp straight stabbing awl Straight edge knife |
Heavy weight scissors Marker Ruler Measuring tape Linen thread Bee's wax Dinner fork |
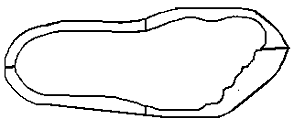
- Sole – Stand in the center of a Manila folder (or a heavy piece of paper at least 3 inches larger than your foot all around your foot). Draw an outline around your foot with the pencil perpendicular to the paper. Mark the area of your instep on either side of your foot on your outline as well as the center front and back. Add 1/8 inch around your outline along the sides and heel, and 1/2 inch to the toe area in front. If you wish a pointed toe, this is where you want to add it. Cut the foot-shape out of the paper. Place pattern on your 8oz leather and use the straight edge knife to cut out. The result should look like this:

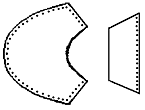
- Vamp and Back Quarter – Our pattern will consist of two pieces for ease of construction but can easily adapt later to a more historically correct form. The vamp covers the front of your foot and the quarter wraps around the back of your heel. Begin by draping the canvas over the top of your foot with about 6 inches curled up the front of your leg. Slice the curled fabric down to your instep. Draw around the top of your ankle and then extend the line down to the floor at your instep area. Draw along your foot on the fabric on the floor. Use the tape measure to measure from the floor to your mark around your ankle and add an inch. This is the height of your quarter. Measure around the back of your foot to the marks you made to the floor from your instep and add 2 inches to your measurement. This is the length of your quarter. Take your fabric vamp and add an inch around the front area for a seam allowance. Cut out the vamp and the quarter from the fabric. Place your pattern on the smooth side of your 5-6oz leather (non-flesh side) and draw carefully around your pattern. Cut out with scissors and punch holes every 1/16", 1/8" from the edge of the leather along 3 sides on the vamp. Do not punch the side along your ankle. Repeat the process on the bottom of the quarter. A dinner fork can give you proper stitch hole spacing. Your result should look like this:

- Heel stiffener – 12th century heel stiffeners (or counters as they are also described) were triangular or semi circular pieces sewn with a binding stitch into place without breaking through the outside surface of the shoe. Your stiffener should be about 2 1/2 inches wide and 1 1/2 inches tall to adequately hold your heel from sliding out of your shoe. Stiffeners were applied with the binding stitch to center back of the heel.

Construction:
Now we put it all together with a flesh-edge seam. On the rough side of your sole, mark a line 3/8 inch from the edge, all the way round to act as a guide when piercing the sole before stitching. Use your fork as a spacing guide. Take ˜ 18 inches of linen thread and coat with beeswax. Thread a needle onto each end of the thread and grab your awl. Starting just at one side of the front center point of the shoe pierce through the sole into the flat and out through the edge and through the upper leather's stitch hole (see cross section from Flesh-edge stitch below). Push one of the needles through these two holes and even out the thread so you don't run out of one side before the other.
Make another hole (through both pieces of leather) with the awl on the other side of the point of the sole and thread one of the needles through leaving plenty of slack. Push the point of the other needle in the opposite direction through this hole and then pull some of the thread back (from the first needle). This ensures that the second needle does not pierce the first thread, allowing the stitches to be pulled tight from both sides. If you run out of thread then backstitch a couple of stitches. Start from the same hole with a new length and don't forget to wax it.
Once you have stitched up both of the side seams, you are ready to sew the heel stiffener onto the center of the back quarter. Sew it about 1/2 inches from the edge in the center back of your shoe. Now sew the quarter to the sole in the same manner as the vamp, starting in the center of the sole and working around both sides. Backstitch where the sides overlap a couple of times for strength.
Now you are ready to turn the shoe. To soften the leather, soak it in warm [NOT hot] water until it has completely stopped bubbling. This will make the leather supple enough to turn right side out.
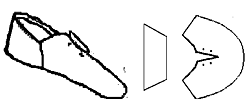
Once your shoe is turned you will notice it is very floppy and has a strange form. This is normal for this stage. Put it on your foot wet to form it. You will probably need to trim the leather around the top of your foot and slit the center of the vamp about 2 1/2 inches down the top of your foot; using a pair of sharp scissors cut away the leather in a semi-circle from one side seam to the other. You should end up with something that looks not too dissimilar to the picture below of the vamp.
Let the shoe dry on your foot till the leather is just damp and then remove it to finish stitching up the sides with an overlapping seam. If you are adventurous, you might attempt the butt stitch however that stitch is best performed when the shoe is inside out. You will punch lacing holes along the vamp slit to help the shoe fit better after you have sewn it together and turned it. To decorate your shoe, you may want to whip stitch around the top of it for a more finished look.

Continued, Part 3

